Posted on

Using Fusion 360 with your laser cutter

Embark on a journey into the fascinating world of laser cutting with our exclusive Fusion 360 tutorial series! Designed for both beginners and seasoned designers, this blog post marks the beginning of an exciting exploration into the realm of precision design.

Your YouTube Playlist

Designing for the Laser in Fusion 360

Fusion 360 Basics: Building a Foundation for Laser Cutting

In our inaugural video, we demystify the essentials of the software, focusing on tools and features crucial for laser cutting applications. From sketching to dimensioning, we guide you through creating a solid base structure, laying the groundwork for more intricate projects.

Fusion 360 Box

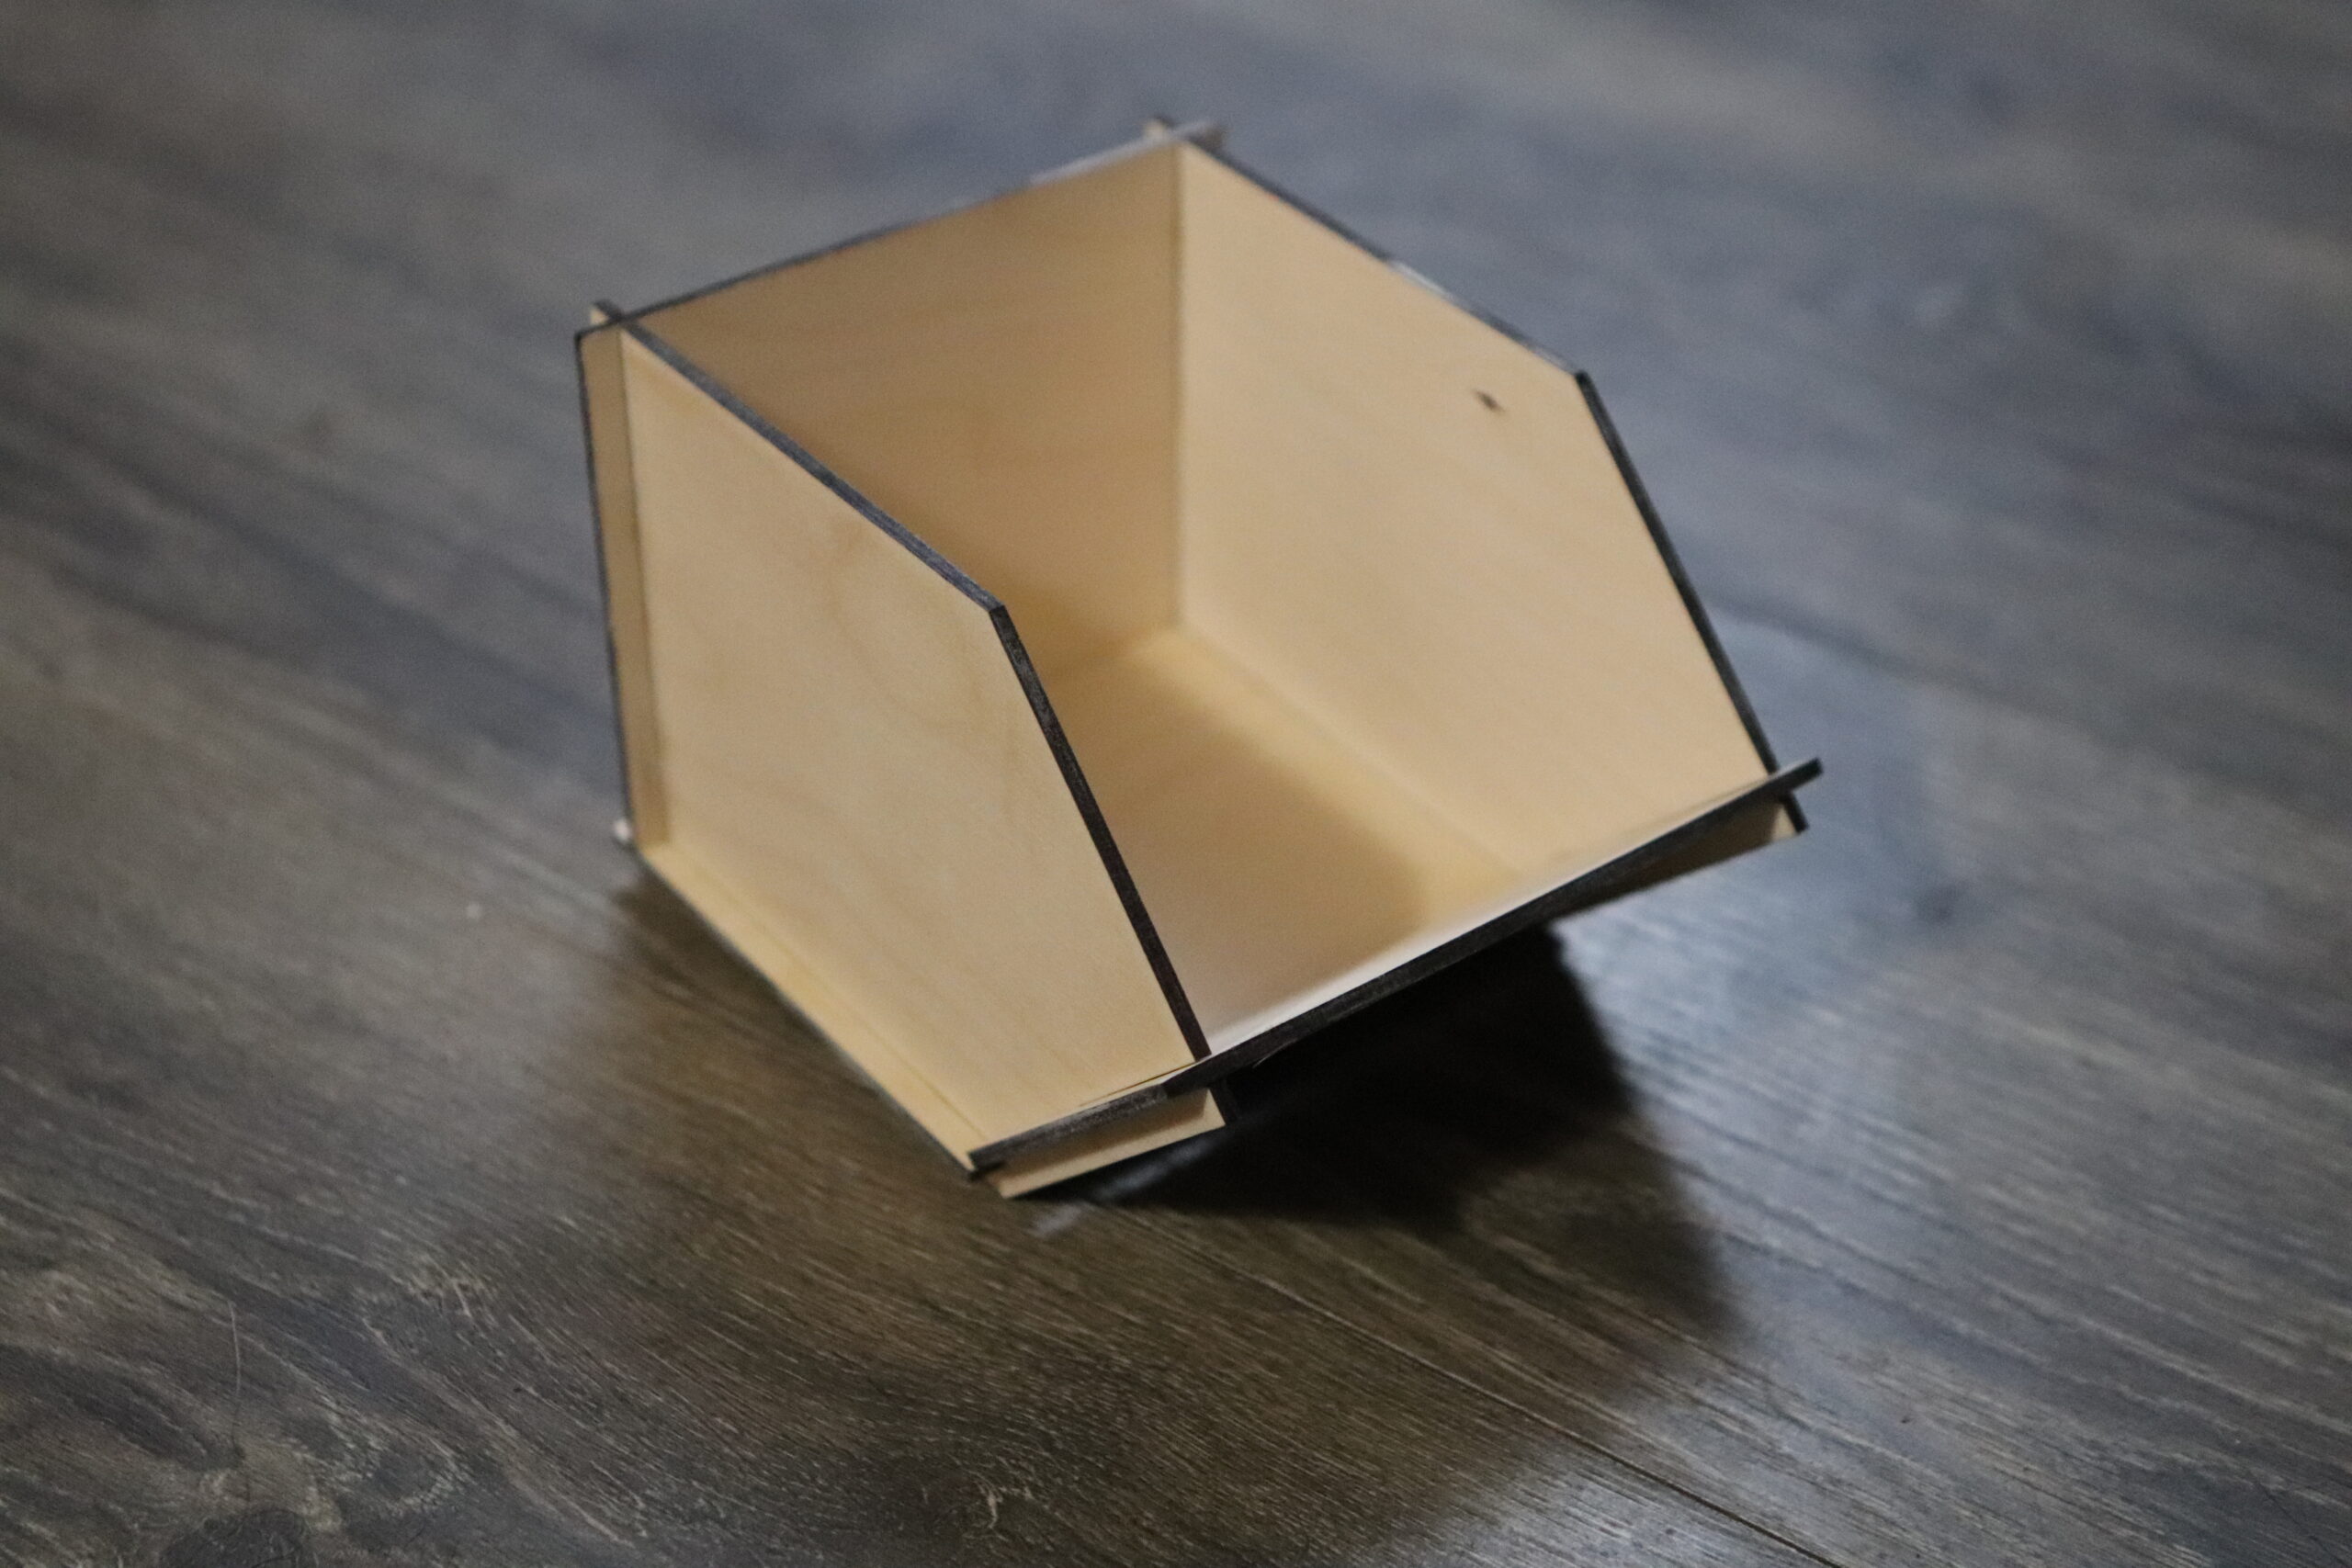
Crafting a Laser-Cut Box: From Concept to Reality

Stay tuned as we take you step by step through the process of designing and cutting a functional box using a 3d CAD modeling software. Each subsequent video in the series will build on the skills learned in the previous one, allowing you to gradually master the art of laser-cut precision.

Fusion 360 Box
Fusion 360 Tutorial Files (2854 downloads )

Why Fusion 360?

Fusion 360 stands out as a versatile and powerful CAD software, ideal for seamlessly integrating design and manufacturing. After downloading, learn how to harness its capabilities specifically for laser cutting. Then, unlock the potential to bring your creative ideas to life with unparalleled precision.

Join the Creative Revolution

Whether you’re a hobbyist, maker, or industry professional, our Fusion 360 tutorial series is tailored to elevate your laser cutting skills. After you watch, stay connected with our blog for in-depth insights, advanced techniques, and insider tips. We will empower you to turn your design concepts into reality.

Subscribe, Share, and Stay Inspired

Subscribe to our blog and share the knowledge with fellow enthusiasts. Be part of a community dedicated to pushing the boundaries of laser cutting creativity. We’re here to empower you with the skills and insights needed to unleash your full potential in precision design.

Ready to take the first step towards laser-cutting mastery? Let the Fusion 360 tutorial series be your guide. Subscribe now and stay tuned for a creative journey that promises to transform your ideas into finely crafted realities.

Posted on

Parts Bin

Parts Bin Digital Download

I was in dire need of some organization so I created the Parts Bin.

There is something just so satisfying about designing something that doesn’t require glue.

I needed something to get the workshop a bit more organized and here it is.

Fun little design with lots of sizes available and upon request.

Join the mailing list to be notified of future Free files, Paid files, or Training Videos!

Subscribe

* indicates required
/ ( mm / dd )
What do you want to be notified about?

Parts Bin

This is a fun little parts bin design that requires no glue. I would probably still use some just to firm it up in a shop but it is pretty sturdy with the right material thickness. Feel free to email me for a size request hereon Facebook, or in the Facebook group Glowforge Creators. I made this from 1/8 inch material I got from Ocooch Hardwoods. I don’t get anything for recommending them, I just really like their wood and shipping time. Always had a good experience.

The dimensions are 4 inches by 4 inches by 6 inches which may vary with the material you use. I have this dimensions for a few sizes listed in the product description.

If your nervous about the complexity of the setup, let these instructions ease your mind.

Download “Parts Bin Instructions” Parts-Bin-Instructions.pptx – Downloaded 11631 times – 557.56 KB

Some Endorsed Products

The wood for this project came from Ocooch Hardwoods though I often use  https://amzn.to/3oyG8Xq #ad as well.

I would highly recommend  https://amzn.to/3epaUvY #ad I also use  https://amzn.to/3Nt9d0E #ad as well. It doesn’t adhere quite as well but it is one of only a few 12 inch wide rolls I could find. I like it so far because of how easy it is to get off.

If you want to make gluing a lot easier I recommend  https://amzn.to/3qxshSz #ad with  https://amzn.to/3IqnOHX #ad. It really helps!

Download Here

As an Amazon Associate I earn from qualifying purchases.

Posted on

Kitchen Utensil Holder

The Kitchen Utensil Holder Digital Download is a fun little design for the kitchen counter. Organize your kitchen tools in nice little display! Fun and functional!

This is what it looks like on my counter!

Yes, that’s right, I use this in my own house.

Join the mailing list to be notified of future Free files, Paid files, or Training Videos!

Subscribe

* indicates required
/ ( mm / dd )
What do you want to be notified about?


Kitchen Utensil Holder Details

This is a fun little decoration for the counter that serves as a functional piece as well. I made this from 1/8 inch material I got from https://ocoochhardwoods.com/lumber/. I don’t get anything for recommending them, I just really like their wood and shipping time. Always had a good experience.

The dimensions are 6 inches by 6 inches by 6 inches which may vary with the material you use. I have this dimensions for a few sizes listed in the product description.

Some Endorsed Products

The wood for this project came from Ocooch Hardwoods though I often use  https://amzn.to/3oyG8Xq #ad as well.

I would highly recommend  https://amzn.to/3epaUvY #ad I also use  https://amzn.to/3Nt9d0E #ad as well. It doesn’t adhere quite as well but it is one of only a few 12 inch wide rolls I could find. I like it so far because of how easy it is to get off.

If you want to make gluing a lot easier I recommend  https://amzn.to/3qxshSz #ad with  https://amzn.to/3IqnOHX #ad. It really helps!


Drop your thoughts in the comments below or join the conversation on Facebook in the Glowforge Creators group.


As an Amazon Associate I earn from qualifying purchases.

Posted on

The Start

Welcome to the Laser Build!

Links

Here are some links for materials used in the Laser build

“As an Amazon Associate I earn from qualifying purchases.”

Main outer frame https://amzn.to/3BgsEVb

Gantry https://amzn.to/3BIDe8Z

Spring loaded Nuts https://amzn.to/3UanH97

Rail Support Brackets https://amzn.to/3LkHoHs

Main outer frame https://amzn.to/3eOr4T0

Brackets https://amzn.to/3DsPvQm

Linear Motion Rail Screws https://amzn.to/3RMqwf7

Rail Nuts https://amzn.to/3BbIDDS

Belt https://amzn.to/3S7xUBu

Shaft coupler https://amzn.to/3LjjL1C

Belt tensioner https://amzn.to/3xqTSHP

Rod https://amzn.to/3QNjQvV

Pillow Block https://amzn.to/3RKYKPT

Motor Mounts https://amzn.to/3djrKzo

Motor https://amzn.to/3detERK

Cloudray Ruida RDC6445S Co2 Laser Controller for Laser Engraver and Cutter Machine RDC DSP 6445S 6445G https://amzn.to/3Dn2NOa

Power supply https://amzn.to/3RZhMSE

This is the first of, hopefully, a few different videos as I progress towards a full CO2 laser build. I started with a Glowforge and I loved what it was capable of but really wanted what it lacked. I love my Glowforge and still use it, would definitely recommend it. If you intend to buy one use my code please! https://glowforge.us/f/IGHFNZUP


Getting started on the Laser Build

Some details

I don’t have any drawing of this or 3d models yet. I intend to make them at the end, but for now everything is from my head as I go. That said, there are some details that I know already.

The overall footprint of the machine is 1500mm by 1500mm (roughly 5 by 5 feet)

The height, so far is about 1 foot

The laser I intend to use is a 90 watt CO2 laser.


Posted on

Cat Shower Curtain Clip

The Cat Shower Curtain Clip Digital Download is a file I have been turning around in my head for a while now. I wasn’t sure how it would come out so finally I just made it. It didn’t take too long, made it in about 10 minutes in Inkscape and most of that time is because I am a perfectionist.

This is what it looks like.

Nothing too fancy but you can see the general idea.

Join the mailing list to be notified of future Free files, Paid files, or Training Videos!

Subscribe

* indicates required
/ ( mm / dd )
What do you want to be notified about?


Cat Shower Curtain Clip Details

This is a fun little decoration for the cat lover in all of us. I made this from acrylic that I got from https://cmsacrylics.com/ I don’t get anything for recommending them, I just really like their acrylic and shipping time. Always had a good experience.

The Cat Clip I made is from the black 1/8 inch acrylic. It cut great. The opening for the rod is 2 inches. They will have to slide over one end of the rod and they the curtain can be hooked to the ‘tail’


Drop your thoughts in the comments below or join the conversation on Facebook in the Glowforge Creators group.

As an Amazon Associate I earn from qualifying purchases.

Posted on

The Pumpkin Shelf

The Pumpkin Shelf Digital Download is a file that allowed me to finally try my hand at kerf cutting. I am really happy with the way it came out. I am, as always, very thankful for all of the new users and encourage everyone to join the conversation and put in some requests in my Facebook group, Glowforge Creators.

This is what it looks like.

Assembly is pretty easy but may require some finess.

Download the instructions here if you want to see how its made before purchasing.

Pumpkin Shelf Instructions (10829 downloads )

Join the mailing list to be notified of future Free files, Paid files, or Training Videos!

You can purchase the file from my site by clicking the ‘Shop Now’ button below or find it on Etsy.


Some details

The pumpkin shelf is a fun little seasonal design. This file was made for wood supplied from Ocooch Hardwoods but I often use https://amzn.to/3oyG8Xq #ad. The shelf is currently dimensioned for material that is .125 inches thick.

Most of the files I create come in different sizes but this file is a little different. This is my first attempt at publishing a kerf cut file and adjusting the size will lead to some complications. I am willing to try for some variations but you will have to bear with me, pun intended.

If you have been following along with product recommendations, I tried the same new tape . The tape is from here https://amzn.to/3Nt9d0E #ad. Again, it does NOT adhere as well as other products and that is partially what I like about it. You will definitely want something for the kerf cut pieces because sanding it sucks!


Some dimensions

The material thickness this is dimensioned for is 1/8 inch (.125) and it works great.

The entire design is ~10 inches wide, ~8 inches tall, and ~2 inches deep.

I used about 1.5 sheets of standard 12 by 20 laser material to make mine. It will depend on whether or not you want to use the face piece.

Drop your thoughts in the comments below or join the conversation on Facebook in the Glowforge Creators group.


As an Amazon Associate I earn from qualifying purchases.


Free Download

You can download the kerf cut pattern here for free:

Posted on

Crow Shelf

The Crow Shelf

The Crow Shelf Digital Download is a file that came in as another request from Facebook! Very thankful for all of the new users, tips and tricks! Please join the conversation and put in some requests in my Facebook group, Glowforge Creators.

This is what it looks like.

Assembly is really really easy.

Download the instructions here if you want to see how its made before purchasing.

Crow Shelf Instructions (12071 downloads )

Join the mailing list to be notified of future Free files, Paid files, or Training Videos!

You can purchase the file from my site by clicking the ‘Shop Now’ button below or find it on Etsy.


Some details

This file was made for wood supplied from https://amzn.to/3oyG8Xq #ad. The shelf is currently dimensioned for material that is .125 inches thick and .25 inches thick but I am adding more.

If you have been following along with product recommendations, I tried the same new tape . The tape is from here https://amzn.to/3Nt9d0E #ad. It does NOT adhere as well as other products and that is partially what I like about it. It does the job of preventing smoke and burn marks and then comes right off. I use a scrap piece of wood to push it on with some force and smooth it out after applying.


Some dimensions

The material thickness this is dimensioned for is 1/8 inch (.125) and it works great. There is an additional file for .25 inches. Reach out to me if you need it adjusted though and I will do what I can.

The entire design is ~10 inches tall, ~8 inches wide, and ~2 inches tall.

I used my batch conversion trick to turn all of my SVG’s into PNG and PDF’s on this file. If you haven’t learned the trick, its a real time saver. Take a look here.

I used about 1.5 sheets of standard 12 by 20 laser material to make mine. It will depend on whether or not you want to use the face piece.

Drop your thoughts in the comments below or join the conversation on Facebook in the Glowforge Creators group.


Quick Tips

Ever wondered how to get some of the more complex shapes to fit into cutouts like this? Check out the quick video I made to get vector files for complex shapes and maintain their dimensions.

As an Amazon Associate I earn from qualifying purchases.

Posted on

Fourth of July Tiered Tray

Fourth of July Tiered Tray

The Fourth of July Tiered Tray Digital Download is a file that I though would be fun to take on. I wanted to make a display for some of the products from Jenny in the Discover New Designers page.

Please join the conversation and put in some requests in my Facebook group, Glowforge Creators.

This is what it looks like.

Assembly is really easy.

Download the instructions here if you want to see how its made before purchasing.

Fourth of July Tiered Tray Instructions (11924 downloads )
Assembly

Join the mailing list to be notified of future Free files, Paid files, or Training Videos!

You can purchase the file from my site by clicking the ‘Shop Now’ button below or find it on Etsy.


Some details

This file was made for wood supplied from https://amzn.to/3oyG8Xq #ad. The box is currently only dimensioned for material that is .125 inches thick but I am adding more.

If you have been following along with product recommendations, I am still using the new tape . The tape is from here https://amzn.to/3Nt9d0E #ad. It does NOT adhere as well as other products and that is partially what I like about it. It does the job of preventing smoke and burn marks and then comes right off. I use a scrap piece of wood to push it on with some force and smooth it out after applying.


Some dimensions

The material thickness this is dimensioned for is 1/8 inch (.125) and it works great. I will be adding more thicknesses shortly. Reach out to me if you need it adjusted though and I will do what I can.

The trays are 10, 8, and 6 inches in diameter and with an ~8 inch riser.

I used my batch conversion trick to turn all of my SVG’s into PNG and PDF’s on this file. If you haven’t learned the trick, its a real time saver. Take a look here.

I used about 3 sheets of standard 12 by 20 laser material to make mine.

Drop your thoughts in the comments below or join the conversation on Facebook in the Glowforge Creators group.


Quick Tips

If you don’t like the idea of the sides getting in the way of your displays, put them on the underside of each tray instead of the top. It will add about an inch of height to the overall assembly but still provides a nice clean look.

As an Amazon Associate I earn from qualifying purchases.

Posted on

Hammer Gift Box

Hammer Gift Box

The Hammer Gift Box Digital Download is a file that came in as a request from Facebook. Please join the conversation and put in some requests in my Facebook group, Glowforge Creators.

This is what it looks like.

This design is just for the blank box but there are some images below of different things you can engrave on it.

Assembly is really really easy.

Download the instructions here if you want to see how its made before purchasing.

Hammer Gift Box Instructions (11733 downloads )

Join the mailing list to be notified of future Free files, Paid files, or Training Videos!

You can purchase the file from my site by clicking the ‘Shop Now’ button below or find it on Etsy.


Some details

This file was made for wood supplied from Ocooch Hardwoods and some cutoffs from https://amzn.to/3oyG8Xq #ad. The box is currently only dimensioned for material that is .125 inches thick but I am adding more.

If you have been following along with product recommendations, I tried the same new tape . The tape is from here https://amzn.to/3Nt9d0E #ad. It does NOT adhere as well as other products and that is partially what I like about it. It does the job of preventing smoke and burn marks and then comes right off. I use a scrap piece of wood to push it on with some force and smooth it out after applying.


Some dimensions

The material thickness this is dimensioned for is 1/8 inch (.125) and it works great. I will be adding more thicknesses shortly. Reach out to me if you need it adjusted though and I will do what I can. The dimensions for this can only be adjusted so much because of the nature of the design but I always do what I can for people.

The entire design is ~14 inches long, ~6 inches wide, and ~1.75 tall.

I used my batch conversion trick to turn all of my SVG’s into PNG and PDF’s on this file. If you haven’t learned the trick, its a real time saver. Take a look here.

I used about 3 sheets of standard 12 by 20 laser material to make mine but it will depend on how many Hammer sheets you use. That part is a matter of preference.

Drop your thoughts in the comments below or join the conversation on Facebook in the Glowforge Creators group.


Quick Tips

Ever wondered how to get some of the more complex shapes to fit into cutouts like this? Check out the quick video I made to get vector files for complex shapes and maintain their dimensions.

As an Amazon Associate I earn from qualifying purchases.

Posted on

Laser Cut Acrylic Crown

Laser Cut Acrylic Crown


Acrylic Crown

The laser cut acrylic crown is meant to be a crown based on one of my daughters favorite movies.

A very fun piece, to design. It’s close to the general shape of the one in the movie but you have to change the design a good amount to appease copyright laws. I think I am far enough away but will remove this if I have to. Hopefully, I am in the clear. It is a free download below and there is a quick video of the bending process.

Join the mailing list to be notified of future Free files, Paid files, or Training Videos!

The process for bending is really simple but it can be tedious. First, I tried using a heat gun, which is how I have seen bracelets made. It takes longer then I wanted. Next, I thought it might be easier to boil, so that’s what I did. A quick string on the ends to hold to the head and you’re good to go.